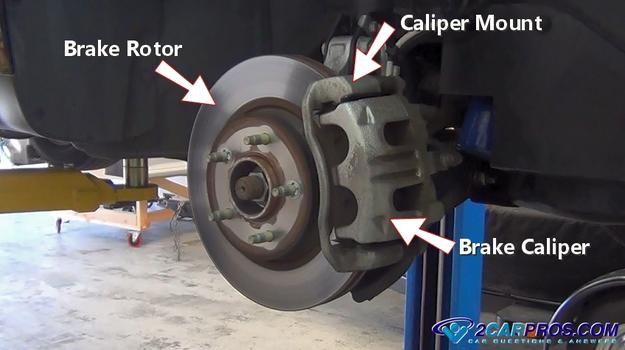
How to Install Front Brake Hardware Kit
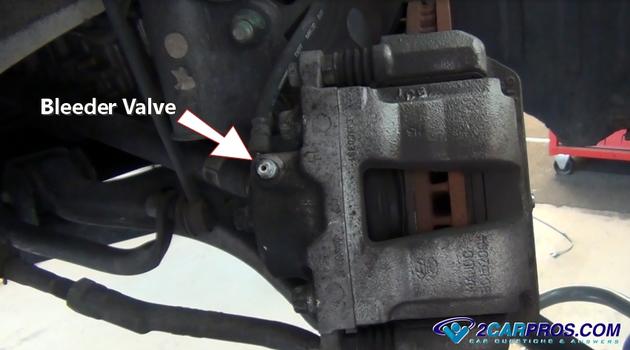
ASE certified mechanics have created this instructional guide including a video on the replacement of your auto's front brake pads and rotors. Front brakes typically don't concluding equally long as rear restriction considering they accept nigh of the task of stopping the car. Depending on driving habits and the design of the car front restriction should last between 20,000 and 35,000 miles. If you were to have the brake chore done that include new pads and rotors at a repair garage it would typically toll between $245.00 and $430.00 US currency in most cases excluding exotic cars. You can go pads and rotors for virtually $110.00 to $140.00 U.s.a. at Amazon or pay a little more at the parts store. Hybrid and electric cars will go much longer on a fix of brakes because the electric motor does most of the stopping to recharge the batteries. SPONSORED LINKS The brake pads, rotors and calipers are a normal vesture particular on all cars and responsible for slowing and stopping the car once it is in motion. If these items are neglected information technology tin can cause serious implications when applying your machine's brakes due to the lack of restriction material (metal on metal). An indication for brake replacement is a squeaking or grinding dissonance when yous hit the brakes. Besides a chirping audio when the vehicle is rolling without the brakes being applied or a brake arrangement alert low-cal on which indicates the restriction fluid is low. Low brake fluid is an indication of needing brake pads because the fluid displaces the missing pad material in the calipers. This guide includes both front wheel and rear wheel drive vehicles which use a bearing hub or old fashion serviceable bike begetting set ups. Simply remove i caliper and consummate the restriction replacement on one side at a time. Identity Restriction Components: A disc restriction system consists of a brake rotor, caliper, caliper mount and an inner and outer pad ready which is held inside of the caliper (bicycle removed). Reset the Restriction Caliper: With the ignition key in the unlock position grasp the caliper and plough it outward to gain access to the mounting bolts. Then locate the brake caliper bleeder spiral which is toward the top and remove the dust cap. The fluid that is in the caliper could be contaminated and may contain small clay, metal or rust particles. SPONSORED LINKS When pushing the piston dorsum into the caliper this contaminated fluid tin crusade problems for the ABS valve, motor and master cylinder which can crusade these components to neglect. This step is to let the brake fluid that has entered the brake caliper in place of the worn brake pads to be removed. Employ a small wrench in most cases an 10mm and fit it over the bleeder valve. Next attach a piece of rubber tubing or hose over the bleeder valve while the other end of the hose is sitting in a fluid container. Push button the wrench counterclockwise to open up the valve (rubber tube optional). In one case the bleeder is open use a small-scale pry bar or big apartment blade (standard) spiral commuter to wedge it between the rotor and old brake pad. Then start applying force per unit area back and forth to widen the gap while pushing the piston back into the caliper. Fluid will start to menses from the tube and into the container. Continue this operation until you cannot push the piston whatever further back into the caliper. While property pressure level on the piston close the bleeder valve and so remove the hose and wrench. SPONSORED LINKS On some calipers is it difficult to reset the caliper in the fashion so this footstep will need to be washed after the caliper has been removed using a big C clench or channel locks. If channel locks are used install an old pad to help protect the caliper piston. Remove the Brake Caliper: Locate the caliper mounting or slide bolts on the inside of the caliper. The commodities head sizes tin either exist 14mm, 15mm, 18mm, 8mm or 10mm hex drive, or a 35 torx scrap in most cases. (Some Volkswagen'due south use their ain special 12mm or 14mm x point torx to keep you from doing the brakes with normal tools, y'all must take this special tool to the job) Use a ratchet or wrench to loosen and remove both bolts past turning them counterclockwise. You lot might need an additional wrench to hold the caliper slide from turning but this is non typical. In one case removed inspect the status of the threads and replace them if worn. At present the caliper will be loose. Grasp information technology to remove the caliper from the brake pads and the caliper mounting bracket. If the caliper has not been retracted you lot may need to rock the caliper dorsum and forth a fiddling to remove it. Once the caliper is gratis from the pads gear up it securely on the lower control arm, strut bulk head or use a zip tie to hold it out of the mode. Exist careful not to bend, kink or permit the caliper to hang from the restriction flex hose. SPONSORED LINKS Thoroughly inspect restriction caliper and brake hose for leakage, cracks or chaffing and supersede it if needed. Remove the Brake Pads: Once the restriction caliper has been removed grasp the inner and outer pads and slide them outward from the rotor and out of the caliper mounting subclass. You can use a standard screw driver and wedge it between the pads and the rotor to assistance in the removal. Sometimes the pads will get stuck on the caliper upon removal which you lot tin can and so pop them out from the caliper to remove. Audit the worn pad and silencer shim. Look for uneven wear which is an indication of a seized caliper slide which will demand to be serviced. Nosotros volition show you how to do this afterward in this guide. Remove the Caliper Mounting Bracket: The caliper mounting subclass must be removed to replace the restriction rotor in most cases. Locate the mounting bolts on the inner office of the subclass. The commodities caput size volition exist larger than the caliper mounting bolts such as 17mm, 18mm or 19mm in nigh cases. These bolts can be held in with thread lock then make sure the socket or wrench is on deeply before applying pressure level counterclockwise to remove them. SPONSORED LINKS When removing the last bolt the mounting subclass volition become loose so keep your hand on information technology and so it doesn't fall. This subclass will contain the caliper slides which will need to be removed and cleaned before reassembly. These slides assistance the caliper float to ensure that both inner and outer brake pads wear evenly. At present the restriction rotor is gear up to be removed. A brake rotor is designed to utilize brake force per unit area provided by the brake arrangement to finish the car. This brake rotor utilizes friction and heat to convert momentum into stopping power. Brake pads ride against either side of the brake rotor and are held in identify past the brake caliper. Restriction rotors can either be solid or ventilated depending on the application blueprint. Replacement costs for brake rotors have come way downward in recent years and replacing them has become the preferred method over resurfacing. There is a minimum thickness measurement requirement designed to uphold rotor operation integrity. In one case a rotor reached this minimum measurement it must be discarded or it can warp causing the steering wheel to shake when the brakes are applied. A brake rotor is only capable of property a specific amount of heat. Once this level is reached the restriction rotor cannot hold additional heat causing the brakes to fade. Brake fade is a condition that will hinder the brake performance until the brake rotor has cooled. If a brake rotor is subjected to prolonged overheating weather it tin destroy the rotor by crystallizing the rotor's metallic causing hot spots which volition create a grumbling sound when the brakes are used. A brake rotor's surface can become uneven and have groves in information technology as the brake pads wear which is a natural occurrence. New restriction pads are perfectly apartment and need a flat surface to mate against. If new brake pads are installed onto a worn brake rotor it can cause weak brake operation and squeaking. This can cause the brake pedal or steering bike to pulse when the brakes are applied. SPONSORED LINKS It'due south not a good idea to install new brake pads on an old brake rotor because the braking surface volition exist uneven and will diminish the brakes ability which can make the automobile pull 1 way or the other when braking. This is known equally "slap pads on it" and is the very cheapest way to practise a front bake job. Supersede the Restriction Rotor: Some brake rotors are held to the bearing hub with a mounting screw or sheet metal clip on the bicycle stud. Use a screwdriver or impact screwdriver to remove the screws. At that place likewise may exist sheet metal clips that can be removed with a pair of side cutters (dikes). These clips tin can then be discarded. These mounting screws can be on at that place pretty tight in which instance you must employ an impact screwdriver which looks like this and is available from Amazon or you can hire it from the parts store which is pretty cheap. While wearing safety goggles utilize a hammer and strike the end of the bear on screwdriver which will unlock the spiral and arrive more easily removed. The impact screwdriver has two settings, tighten and loosen so make sure you have it on the correct setting. SPONSORED LINKS After removing any mounting screws or clips the rotor should be loose. Sometimes the rotor can be stuck due to rust and the fact the wheel is tightened against it and the bearing hub. While still wearing safety goggles use a plastic or regular hammer to daze the rotor loose for removal. This can take some strength so don't be agape to requite it a adept potent strike of a metal hammer. In one case the old restriction rotor has been removed match it to the new rotor. Check the outer diameter and mounting offset forth with the wheel stud location, they should exist an identical match. Some people like to re-machine rotors using a restriction lathe. We recommend new ones because the re-machined rotors will have less metal to dissipate heat with which can make them warp. This condition will brand the steering bicycle milkshake when applying the brakes. Utilise a shop towel and wipe off the mounting surface of the bearing hub and make sure it's costless from dirt and grease. This volition allow the new rotor to sit squarely on the bearing hub. Once the quondam rotor has been matched to the new unit of measurement, align the wheel studs and rotor mounting screws. Then skid the rotor onto the bearing hub. Install the rotor mounting screws and tighten. You do not demand to employ the bear upon screwdriver to make the screws super tight at this point because the rotor will be held on by the bicycle and lug basics. On older cars and light trucks the rotor volition house the axle bearings and grease seal which will demand to be cleaned and repacked (serviced). SPONSORED LINKS Here is the video of the task getting done. After watching please keep down through the guide to gain additional information which is updated regularly. The caliper sides are designed to allow the caliper to float while being bolted to the mounting subclass which helps the restriction pads wearable evenly. When brake caliper slides become stuck due to rust and corrosion the car can pull while braking which causing ane pad to wear excessively compared to the opposite pad in the caliper. It can as well crusade the brakes not to release in one case applied and create excessive heat. SPONSORED LINKS Remove the Slide Bolts: Grasp the slides and pull them outward while twisting this will assist interruption the dust boot seal loose. Continue to piece of work the slides outward until they come free from the mounting bracket. If a slide is stuck or seized in the bracket use a vise to hold the bracket and a pair of pliers to work information technology loose by moving it dorsum and forth while applying WD40 and pulling them outward. Use a shop towel carburetor or restriction cleaner and a wire brush to clean all rust and corrosion from the slides. Cheque the slide bolts for clothing and replacement them if excessive wear is observed. In one case the slides take been cleaned apply a sparse layer of silicone brake lube to both slides. Some slides will take a dampener on 1 cease be sure to non become these mixed up. Install them back into the hole they came out of. SPONSORED LINKS Reinstall the Slides and Caliper Mount: Install the caliper slides into the caliper mounting bracket with a twisting motion and make sure the slides move easily in the out. If not, remove the slide for more investigation. These slides tin can become worn and have groves in them in which case they will demand to be replaced. Slide pin grooves can cause the caliper to hang which will create uneven pad wear and braking characteristics. Earlier reinstalling the caliper mounting bracket clean the threads of the bolts by using a small wire brush. And so hand thread in both mounting bolts into the bracket. Tighten the bolts evenly to manufacturer'due south specifications which is usually between lxx and ninety pes pounds. A small corporeality of thread lock tin be used to ensure the bolts do not come loose. Once the caliper has been removed and the rotor replaced you are ready to install the new brake pads. Brake pads are designed to blot rut equally they create friction against the restriction rotor when the restriction pedal is activated. These pads ride against either side of the rotor which are held in place by the brake caliper which is typically mounted to the spindle or backing plate. Hydraulic pressure is provided past the brake system via a restriction master cylinder. When the brake organisation is activated the brake pads are forced against the restriction rotor causing it to tiresome down the motion of the car. Brake pad backing plates are made of metal and there are several different classifications of the restriction pad composites for example; organic, semi metallic and ceramic to proper name a few. The organic pad is used mainly for stock applications. The semi metallic is used for trucks and SUV'due south while the ceramic pad is used for extended life applications. Each of these pads possess individual wear and usage characteristics for example; organic pads are the nigh forgiving pad when information technology comes to brake rotor vesture and tend to brand less brake racket such as squeaking. Semi metallic pads tend to be more than abusive to the rotors but tin take more rut and so organic pads earlier brake fade occurs. Ceramic pads are the hardest pad of the group and can wear out the rotors over the life of the brake pad. Ceramic pads can also be associated with brake noises such as squeaking and grumbling. The reward of the ceramic pads is the lifespan of the brake pad ready is about xx% longer than a regular restriction pad. Every restriction pad manufacturer has their own mixture of composite material that can vary in cost and quality. This material is bonded or riveted to the pad's metal backing plate. Install the Pads: When replacing the brakes always match the old brake pads to the new brake pads. The bankroll plate of the brake pad should be identical to the old except for the missing composite material. Some pads are fitted with anti rattle clips. These clips are blueprint to allow the pads to movement freely within the caliper mount. If these clips are non included with the brake pad set transfer the erstwhile clips to the new brake pad set up. Do not discard the anti rattle clips this will result in the pad having excessive clearance which will create a popping or clicking sound when the brakes are practical. Some brake pad designs will include a screamer fashion of wear indicator. This minimum thickness indicator was created to brand a chirping or screaming noise when the brakes are in the idle position or when the brakes are applied. SPONSORED LINKS In an effort to assist continue the brake pad in place auto manufacturers have designed built in outer clips that hold the pad to the inside and outside of the caliper. The inboard pad prune fits inside the caliper piston while the outboard pad clip attaches to the outer part of the caliper. These clips hold the brake pads into the brake caliper. In the example below yous can see the pad screamer which is what creates the squeaking or chirping noise when your brakes are getting low. This safety device is to warn yous the brakes demand replacing. At the upper side of the pad you tin see metal which coins the phrase "my restriction are metal to metal" meaning the backing plate of the pad which is made of metallic is contacting the rotor which is also metal. When brakes are in this condition the stopping power is greatly compromised. Compare the old pad to the new i and pay special attention to the size of the pad's bankroll plate tang. These tangs are what concord the pad in place. If the tang is as well large it will not fit into the caliper mounting plate and if the tang is likewise small the pad will rattle and click when driving or stopping. Also the screamer warning tab needs to exist in the same identify as the old pad when installed back into the mounting subclass. Match the one-time pad backing plate size to the new pad. Some new pads have an anti-squeak vibration shim already fastened to the rear of the backing plate so no additional measures to cease restriction squeak is needed before installation. In older application an anti-squeak spray or blanket was used merely usually had trivial to no consequence on stopping restriction noise. In some applications new an anti-rattle prune sets are supplied with the pads. Remove the old retainer clips and install the new ones onto the caliper mounting subclass. SPONSORED LINKS When installing pad anti-rattle clips into the caliper mounting subclass make sure the orientation of the clips are correct. Install the new pads one at a time. Push down on the jump retainer clip and nose the peak of the pad in to rest it squarely against the rotor. This is what information technology looks like when both pads are correctly installed against the brake rotor. Brand sure the pads move freely inside the subclass with no admission play. The caliper is now prepare to be reinstalled. (Annotation: The pad with the sensor is unremarkably in the inboard position). Reinstall the Brake Caliper: While holding the caliper slides inward gently set the caliper over the brake pads. If you have difficulty getting the caliper in identify double check to make sure the piston is fully retracted into the caliper and the slides are pushed into the mounting subclass. Double check the piston position with a large C clench or channel locks and push button the piston in. One time the caliper is successfully over the pads and slides install both mounting bolts by hand one at a time. So tighten the bolts to manufacturers torque specification which is unremarkably 35 to 45 human foot pounds. Some slides take a hex where a wrench tin can be used to concur the slides from turning while tightening the bolt. Now completed echo this brake job process for the opposite side of the car. Adding Brake Fluid: Open the hood and locate the brake primary cylinder which is usually on the commuter's side near the firewall. Utilise a store towel and clean the brake master cylinder reservoir and lid to ensure no dirt falls into the fluid then remove the hat then fluid tin can be added. Add brake fluid from a sealed container until the level meets the "Full" line on the reservoir. In one case the fluid has been installed to its proper level reinstall the lid and wipe an excess restriction fluid with a store towel. Later the restriction pedal has been pushed down and proper restriction pressure has been obtained recheck the fluid level and re-add if needed. Push button Down On the Brake Pedal Slowly: In one case the opposing side is consummate double check your work to make sure all bolts are on and tight. Slowly push the brake pedal downward, the pedal volition become to the floor. And then allow it support very slowly, never pump the brakes speedily. Repeat this performance until you feel the brake pedal become normal and have pressure. This can take four to 7 cycles. This operation is forcing the brake pads to travel to the brake rotors while taking up the air gap between the pad, rotor and caliper piston. Practice this until normal brake operation has returned (restriction pedal is in its normal position). Moving the pedal slowly helps prevent air bubbles being trapped in the organization which alleviates haemorrhage. If the pedal seems spongy air is trapped and the restriction system needs bleeding. Breaking In the Restriction pads and rotors: Subsequently a restriction service has been performed and the motorcar is safety on level ground recheck the restriction pedal operation. This should be done with the auto running and in park to aid the power brake organization. When first using the new brakes they will not work as skilful because they have non been broken in yet this means the pads have non mated to the rotor. To do this properly take the car for a examination drive use the brakes gently while doing like shooting fish in a barrel stops. So releasing the pedal monetarily and and then reapply it while stopping. This volition break in the pads while assuasive them to cool and release any brake fabric disbursed in the process. Echo this procedure v to 7 times at this indicate the brakes are ready for the open road and the restriction pedal performance should be normal. If you lot hear whatsoever foreign noises or the pedal is soft or spongy recheck the job past re-jacking the car up and removing the wheels of inspection or re-bleeding the system. Never continue to drive a car without normal restriction pedal operation. If you accept whatever questions brakes delight visit our forum. If y'all need Commodity published 2022-02-08 How Long Do Brake Pads Final?
How Much Practice They Price?
What Goes Wrong?
Forepart Restriction Replacement
Footstep one
Step 2


Step 3


Stride four


Step v


Restriction Rotor Replacement
What Goes Wrong?
Step 1


Watch the Video!
Service the Caliper Slides
What Goes Wrong?
Step one


Step two


Install New Brake Pads
How Do Brakes Pads Piece of work?
Step 1


Step 2


Step three


Step four

Step 5
Got Questions?
0 Response to "How to Install Front Brake Hardware Kit"
Post a Comment